Container Engines like Podman and Docker provide GUI and CLI utilities for managing the state of containers. They also provide features such as container image management, metrics, logging, and debugging tools. The examples in this article use Podman but CLI commands are mostly interoperable with Docker.
We can install Podman on your system by following the steps in Podman Installation Instructions. Podman also provides a graphical interface for managing containers, images, and other resources called Podman Desktop.
Accessing Container Images
To create a container first, we have to download its image from a registry. A container image is a file that contains all the dependencies and executable code for the container.
Images could be fetched from container registries such as DockerHub or Quay.io.
Login to Container Image Registry
A container image registry is a service that handles the storage and distribution of container images. It is necessary to log in to the container registry to access private images.
podman login docker.io
After executing this command a prompt will ask for your username and password, for that we need to have a container registry account. Images used in this article are public so we don’t need to create an account or log in.
Once login is successful, Podman stores the encrypted user information in file ${XDG_RUNTIME_DIR}/containers/auth.json. XDG_RUNTIME_DIR is an environment variable set by systemd that stores the path of the directory containing user-specific runtime files.
Pulling Container Images

Pulling container images from registries
Public registries provide an interface for searching images or Podman’s subcommand search could also be used.
podman search httpd
Once we have the image name we can pull it on our machine using the pull subcommand
podman pull docker.io/library/httpd
or using the Podman Desktop app you can go to Images -> Pull an Image.

Pulling container image using Podman Desktop
Different versions/variations of container images are managed by Tags. The image tag latest is pulled by default. You can view the list of available tags on the registry’s webpage or use skopeo list-tags. Skopeo requires the transport (docker in our case) to be mentioned explicitly with the image name.
skopeo list-tags docker://docker.io/library/httpd
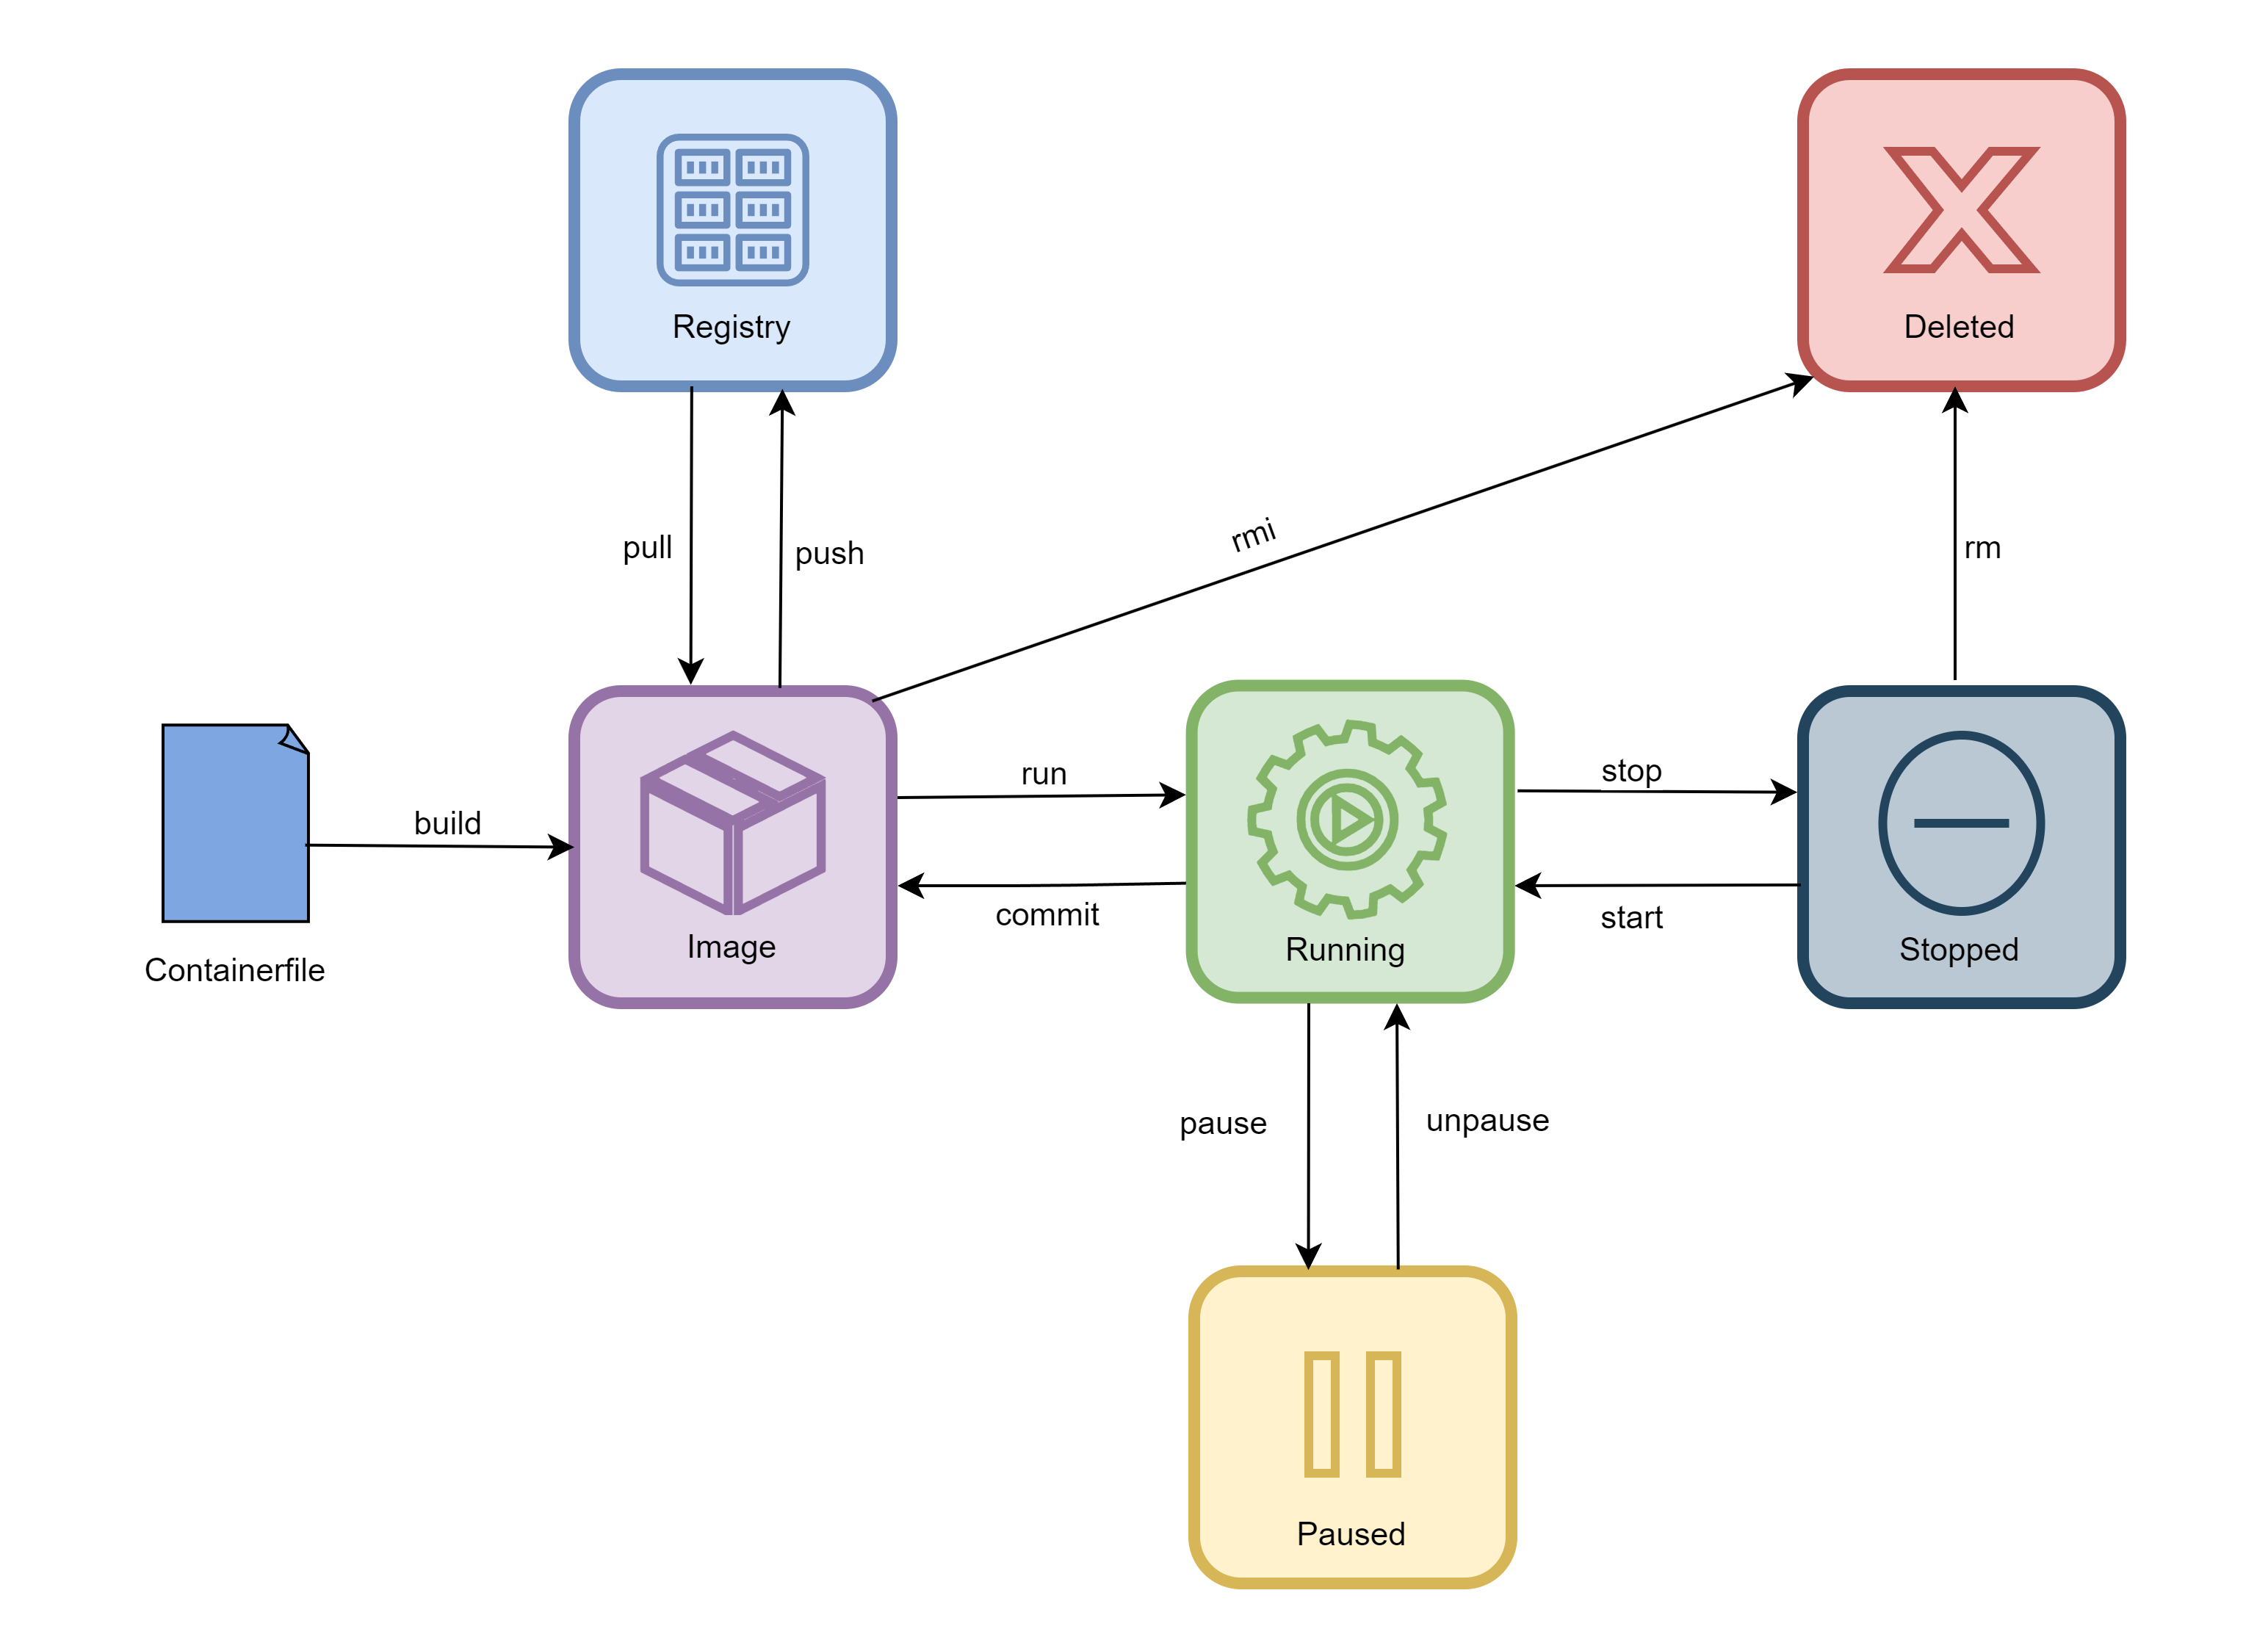
Managing Container Lifecycle
Once we have access to the container image we can easily create one or more containers.
Creating a Container

Creating a container from the container image
We use the run subcommand for creating containers. If the image specified in the command is not present in the system then Podman will attempt to pull it from the registry.
podman run --name httpd-test docker.io/library/httpd
After executing this command a container named httpd-test will be created on your system and its output will be attached to your terminal. To exit you can use the shortcut Ctrl+C. To run the container in the background --detach flag could be used.
podman ps command will list running containers on the system.
On Podman Desktop, the Containers section provides utilities for managing the state of containers.

Creating container using Podman Desktop
Executing Commands inside a Container
To run a container and access its shell we have to use options --interactive & --tty.
--interactive will allow us to provide inputs to the process running inside the container and --tty will attach a pseudo-terminal to the container.
Entrypoint specifies a command that is executed during container initialization. It could be defined by default in the image, but you can override it with the --entrypoint flag.
podman run -it --name httpd-test \
               --entrypoint="/bin/bash" \
               docker.io/library/httpd
To execute a command or script inside the container we use Podman’s exec subcommand.
podman exec httpd-test echo "Hello, world"
Attaching Volumes
Directories from the host could be mounted on a container. It is useful when scripts are edited outside the container (an IDE/Code Editor on the host) or the files have to be shared between multiple containers.
To mount a directory from host to container flag --volume could be used with run subcommand and values are passed as <HOSTDIR>:<CONTAINERDIR>.
podman run -it --name python-test --detach \
               --entrypoint="/bin/bash" \
               --volume $(pwd):/app:Z \
               docker.io/library/python:3.10.6-slim-bullseye
This command starts a python container with contents of the present working directory (fetched from the pwd command) mounted on the /app directory inside the container. Both directory paths have to be absolute.
Before mounting the host directory we have to change its SELinux context to container_file_t otherwise we could encounter permission issues while accessing directory contents. To change the SELinux context you can append either :z (if multiple containers need read-write access) or :Z (if only the current container needs read-write access).

Accessing volumes on Podman Desktop
Port Forwarding
To communicate with the services running inside the container, port forwarding has to be established from the host using the --publish flag in the run subcommand. The port specified for the host and container could be different for example the following command forwards the output from the httpd-test container’s port 80 to port 8080 on the host.
podman run --name httpd-test --detach \
           --publish 8080:80 \
           docker.io/library/httpd
To view the output we can visit localhost:8080 in our browser. It is advised that only the necessary network ports should be forwarded from container to host.
Pausing an Executing Container

Pausing running container
To demonstrate a paused container we will take the help of the following Python script
# This script runs an infinite loop
# with the time interval of 2 seconds to slow down the output

import time
i=0
while True:
    print("Value of i: {}".format(i))
    time.sleep(2)
    i+=1
Assuming that this script is saved in the current directory with name counting.py, we run a container created from image docker.io/library/python:3.10.6-slim-bullseye in detached mode.
podman run -it --name python-test --detach \
               --entrypoint="/bin/bash" \
               -v $(pwd):/app:Z \
               docker.io/library/python:3.10.6-slim-bullseye
Then we execute the script inside the container in interactive mode
podman exec -it python-test python3 /app/counting.py
An infinite loop will be initiated and the output should be visible on the terminal. Now we open a new terminal window and pause this container.
podman pause python-test
If we go back to the first terminal we can observe that the script execution is paused. When unpaused the container will restart right where it left.
podman unpause python-test
Stopping an Executing Container

Stop running containers
While pausing a container stops its execution in its current state, stopping a container kills the executing process.
podman stop python-test
Upon restarting container will run the entrypoint command, starting a new process.
podman start python-test
Deleting a Container

Deleting containers
Before we delete a running container we have to stop it or we can use the --force flag along with the rm subcommand.
podman rm python-test
Metrics and Logging
Listing Containers
By default, the ps subcommand fetches the list of running containers but to view all the containers regardless of their state we can use the --all flag.
podman ps --all
Resource Utilization Statistics
stats subcommand provides live statistics of resource utilization by containers.
podman stats
Accessing Logs from a Container
To access the logs of a running/completed container we use the logs subcommand. To view the live output from a running container --follow flag is added.
podman logs --follow httpd-test
To access the container logs from Podman Desktop we can click on the container name in the Containers section.

Accessing container logs from Podman Desktop
We can also attach a terminal to the container from the Terminal tab.
Thank you for taking the time to read this blog post! If you found this content valuable and would like to stay updated with my latest posts consider subscribing to my RSS Feed.
Resources
Podman Installation Instructions
Podman Desktop
podman-login
XDG Base Directory Specification
httpd container image
python container image
podman-search
podman-pull
podman-run
podman-exec
podman-pause
podman-stop
podman-stats
podman-logs